

A dull knife does not need a new knife. It needs twenty minutes and one stone. The problem is that most guides describe sharpening as if you already know how, then skip the two things that actually decide the result: the angle you hold, and whether you formed a burr at all.
This is the sequence that works on a single 1,000-grit water stone, in the order you actually do it.
What you actually need
- A 1,000-grit water stone. Not a 6,000, not a kit of five.
- Water, and ten minutes of soaking if your stone is not splash-and-go.
- A folded towel, so the stone does not slide and your counter survives.
- The knife you actually use. Practice on the cheap one.
- Optional: a strop, or a leather belt, for the final pass.
That is the whole kit. Everything else sold alongside sharpening is either for a different job or a different decade.
Find your angle before you touch steel
Angle is measured per side, from the stone surface to the blade face. Most Western kitchen knives want 15 to 17 degrees. Japanese knives at HRC 61 and above take 12 to 15, because harder steel holds a thinner edge. Anything used on bones or frozen food wants 20 or more.
You do not need a protractor. Two methods get you close enough:
- The coin stack. Stack two coins on the stone, rest the blade’s spine on them with the edge touching the stone, and lock your wrist to that angle. That is roughly 15 degrees for a 2 mm stack.
- The marker test. Colour the bevel with a marker, take three light passes, and look. If the ink is gone only at the very edge, you are too steep. Ink still present at the edge means you were too shallow.
Once you know the angle, the rest is repetition. The per-knife angle table covers every common blade type if you want the exact number, and edge geometry explains why a thinner edge cuts better but fails sooner.
The stroke, step by step
- Soak the stone until bubbles stop rising, then set it on the towel.
- Place the edge on the stone at your angle, with the heel of the blade toward you.
- Push the edge forward and slightly across the stone, as if slicing a thin layer off the surface.
- Lift the blade on the return. Dragging it back dulls what you just cut.
- Work in sections: heel, middle, tip. Overlap each pass so no part of the edge is skipped.
- Ten passes on one side, then flip and repeat on the other.
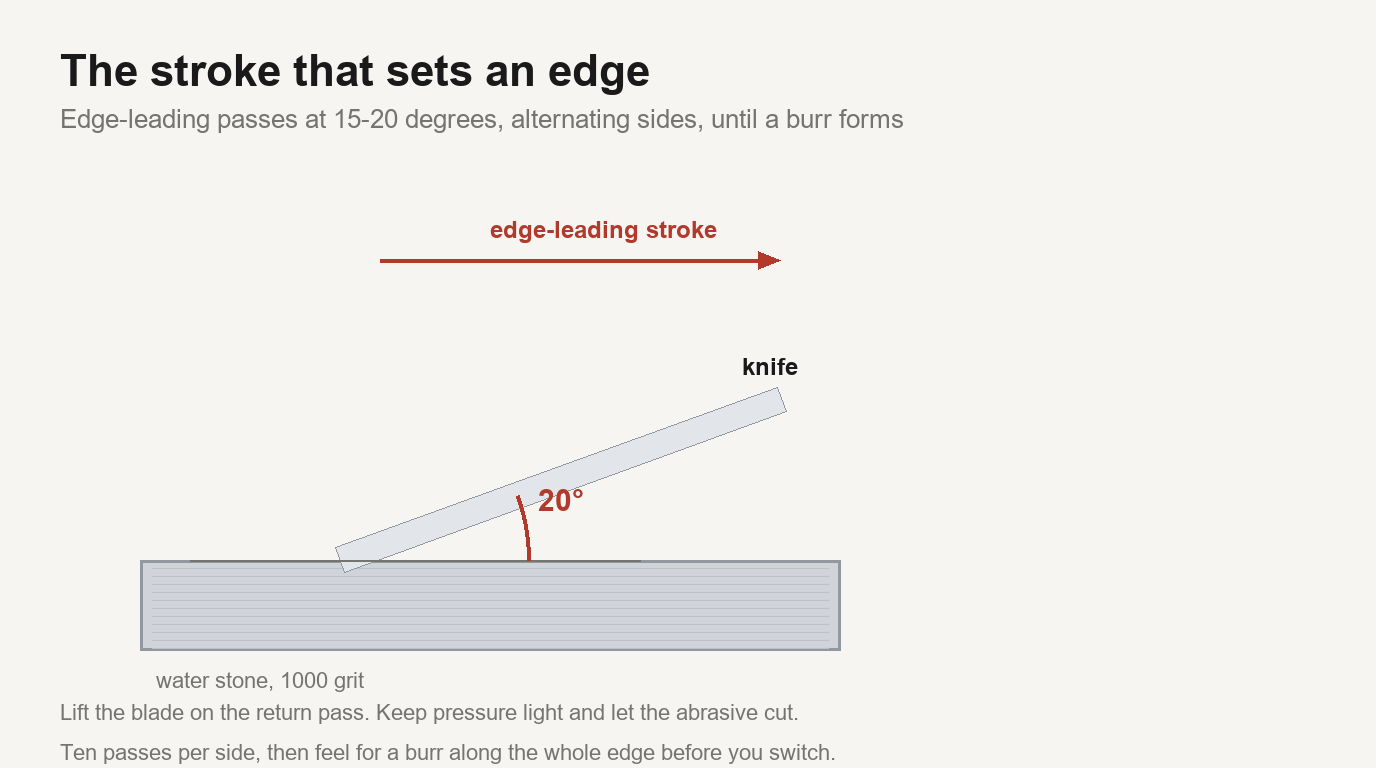
Pressure matters more than speed. Light pressure with a consistent angle removes steel exactly where you want it. Heavy pressure rocks the blade into the stone and rounds the edge you are trying to build.
If your stone feels like it is skating rather than cutting, it needs water, not more force. Water stones cut as a slurry of abrasive and water, and a dry or glazed surface stops cutting.
Build a burr on both sides
The burr is a thin curl of steel that forms on the opposite side of the edge once the two bevels meet. It is the only reliable proof that you have sharpened all the way to the apex.
Check for it by running a fingertip across the edge, never along it. On one side the edge should feel smooth and slightly grippy; on the other you should feel a distinct catch. That catch is the burr. If you cannot feel it, keep going on that side – you have not reached the apex yet.
When the burr runs the full length of the edge, flip the knife and repeat until it forms on the other side. Then remove it: two or three very light passes at the same angle, alternating sides.
Deburr, then strop
A burr left on the edge feels sharp and cuts badly. It folds the first time it touches a board. Light alternating passes on the stone remove most of it; a strop with a little compound removes the rest and polishes the apex.
Stropping is not a substitute for sharpening. It straightens and polishes what is already there, which is also why it is the last step and not the first. Strops and compounds covers the grits and the stroke.
Test the edge honestly
Three tests, in increasing strictness:
- Paper. Clean newsprint or printer paper should cut with a whisper and no tearing. Tearing means the apex is not set.
- Tomato. A ripe tomato with no downward pressure. If the skin resists, the edge is blunt or burred.
- Thumbnail. The edge should bite and hold, not slide. Do this gently – a burred edge bites deeply and then cuts you.
Mistakes that ruin a good edge
- Too much pressure. The fastest way to round an edge is to lean on the stone.
- Inconsistent angle. Fifty passes at fifty slightly different angles create a rounded shoulder, not an edge.
- Skipping grits. Jumping from a dull edge straight to a 6,000 stone polishes a bad bevel.
- A dished stone. A hollow stone cannot hold a consistent angle, and yours is dished sooner than you think. Flattening a whetstone takes five minutes and fixes it.
- Honing a dull knife. A rod straightens edges, it does not create one.
Which stone to start with
One 1,000-grit stone sharpens every ordinary kitchen knife, and it is coarse enough to repair a lightly damaged edge. Add a 3,000 to 5,000 later for a finer finish; add a 220 or 400 only when you actually need to remove chips.
Grit numbers are not interchangeable between brands, and the jump from 1,000 to 8,000 is not a shortcut to a better edge. If you are buying your first stone, the beginner pick explains what to avoid.
One exception to everything above: a serrated knife cannot be sharpened this way. The scallops never touch a flat stone, and a rod is the right tool – see sharpening a serrated knife.
Frequently asked questions
Can I sharpen a knife with just one stone?
Yes. A 1,000-grit stone gives a working kitchen edge and is coarse enough to fix minor damage. A second finer stone improves polish, not sharpness.
How long does it take to sharpen a dull knife?
Ten to twenty minutes for a normally dull kitchen knife on a 1,000-grit stone. Badly chipped edges take longer because you are removing more steel.
Do I need to soak a water stone before use?
Most traditional water stones need five to fifteen minutes in water. Splash-and-go stones only need the surface wet. A stone that keeps absorbing water will not cut properly.
Why does my knife get dull again so fast?
Usually pressure and angle, not the steel. Leaning on the stone rounds the edge, and a burr left on the apex folds on the first board. Both resolve with lighter passes and a proper deburr.
Is it better to sharpen on a stone or use a pull-through sharpener?
A stone removes steel where it should and leaves a straight bevel. Pull-through sharpeners cut a V into the edge, which shortens the life of the blade.
Sources
Background on abrasives and bevel geometry: Sharpening stone and Knife sharpening. Manufacturer guidance on grit grading and stone care: Shapton and Naniwa.